Maps
Room Zero
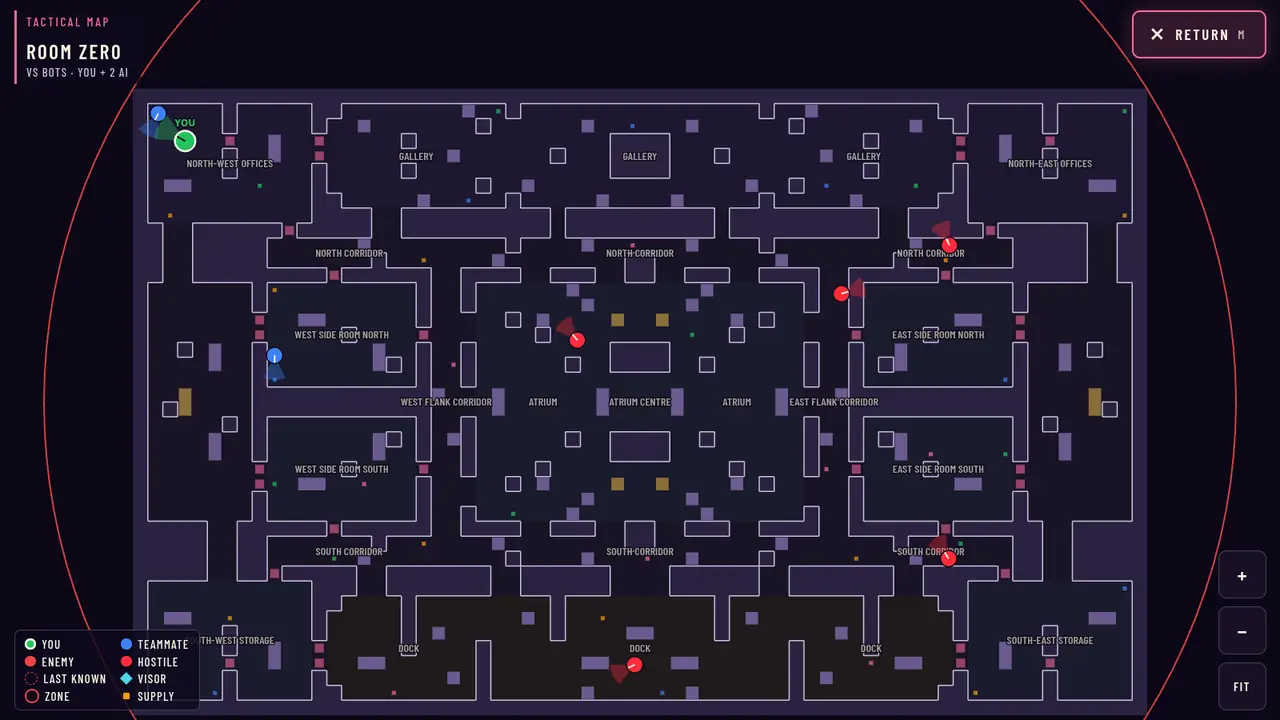
Balanced baseline. Service basement: offices, side rooms, an exposed atrium and a long loading dock.
#Identity
Balanced baseline
A service basement mirrored down the middle, so neither side has the better half. The balanced baseline, and the darkest location: it has no lit areas, so every fight is a lamp-length fight.
- Size
- 68 x 42 m
- Walkable floor
- 1950 m²
- Lit floor
- 0%
- Doorways
- 32 tiles
- Crates / barriers
- 108 / 8 tiles
- Rails / decks / stairs
- 0 / 0 / 0 tiles
- Solo hostiles
- 5
- Supply areas
- 38
#Map guide
Layers
- Wall
- Crate / barrier
- Doorway
- Deck
- Stairs
- Rail
- Lit area
- Online spawn west
- Online spawn east
- Your solo start
- Solo hostile start
- Final-circle centre
- Supply area
Drawn from the level the game plays on. Area names are the ones the in-game tactical map shows. Supply areas are where each kind of supply can appear; the exact tile changes every time one is taken.
#Key locations
A spawn hall at each end. Offices in the north corners and storage in the south corners. Two side rooms per half. A north gallery and a south loading dock span the middle, each with a corridor beside it. A flank corridor runs north to south on each side of the central atrium.
| Area | Supplies that appear there |
|---|---|
| North-west offices | health, ammo |
| North-east offices | health, ammo |
| Gallery | health, armour |
| West side room south | health, grenades |
| East side room south | health, grenades |
| Atrium | health |
| South-west storage | armour, ammo |
| South-east storage | armour, ammo |
| West side room north | armour, ammo |
| East side room north | armour, ammo |
| Dock | armour, ammo, grenades |
| West flank corridor | grenades |
| East flank corridor | grenades |
| North corridor | grenades, ammo |
| South corridor | grenades, ammo, health |
| Atrium centre | ammo |
#Entrances and chokepoints
Doorways connect every room to the corridors, so most rooms have more than one way in. The fastest routes between halves are the north and south corridors; the atrium is the short, exposed way through the middle.
#Sightlines and engagement distance
Wall pillars break up the straight lanes. In the dark you see your own light cone, not the lane.
- Longest straight line
- 28 m (a row or column with no wall)
- Average open line
- 5.1 m (from every floor tile, the four straight lines to the nearest wall)
Measured on the tile grid. Your light reaches 7.5-12 m depending on the operator (more when steady), so in the dark the light, not the lane, sets the fight distance.
#Cover
Crate lines and pillars in the atrium, zigzag cover along the dock. About 5.9 cover tiles per 100 m² of floor.
#Open, dangerous and strong positions
- Open: the atrium, short and exposed from several sides.
- Strong: a doorway into a side room, where anyone coming has to cross your light.
- Dangerous: the long dock with its zigzag cover, where you can be shot from far along it.
#Sound
Every floor carries sound the standard distance here (no carpet, decks or tunnels): a run is heard 8 m away, through a wall 6.4 m.
#Spawns and the danger zone
Online, one side starts at the west end and the other at the east end; the layout is mirrored so both sides get the same map. In Vs bots you start at the marked solo start and the 5 hostiles start at their own points (Stair, Pump, Cellar, Boiler, Hatch). The last circle closes on one of 14 possible centres on open floor, marked in the map guide.
#Tactics
- Creep the last few metres to a doorway; the dark hides you until your own light or noise gives you away.
- Use the flank corridors to come at the atrium from the side instead of crossing it.
- Let the hostiles make noise first: footsteps through a wall give you their direction.
#Common mistakes
- Running through the atrium: it is open from several sides.
- Firing at a sound you cannot see: your muzzle flash shows you to everyone with a clear line.
#In the game